| |
This page describes the initial building process, adding
the components to the case.
Click on any image for a larger, full screen view.
Click here to go back to the previous
page
Click here to go to page two
Stage 1 - Open the case
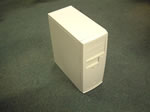 |
This is a midi tower case, and we have checked
that the power supply is suitable for Pentium 4 processors. The
case can usually be opened by undoing some screws on the back
of the case and sliding to outside of the case off. This particular
model has one screw at the top of the rear of the case which can
be undone without a screwdriver. This allows the top of the case
to be slid off, and the two sides then lift upwards to give complete
access to the inside of the case. |
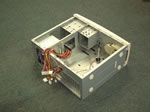 |
In this picture, the two case sides have been
removed to reveal the case components. Click on the image to open
a new window that has a labeled drawing of this case. |
Stage 2 The Motherboard
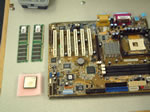
| The next stage is to add the main components
to the Motherboard. Your motherboard should have come inside an
electrically insulated bag with a piece of conductive foam on
the back of the board. Lay the board down on a desk with this
piece of foam underneath.
We are going to install the processor and the memory, and both
of these devices are sensitive to static discharge that may occur
when you touch them, effectively destroying them. Discharge yourself
by touching something that is electrically grounded, such as a
radiator. |
|
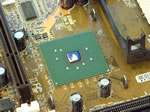
| The motherboard has a large chip called the northbridge
chip, and it has a large heat sink. We are going to remove this
heat sink and change the plastic conducting strip for a higher
performance thermal transfer compound. This step is not essential!
Remove the heat sink by unclipping the clips on each side. The
heat sink should come off easily. This picture shows that some
of the thermal transfer taps is still stuck to the board chip
(its the pink stuff!) |
|
Click here to go to page two |