| |
This page describes the initial building process, adding
the components to the case.
Click on any image for a larger, fullscreen view.
Click here to go back to the previous
page
Click here to go to page four
Stage 2 The Motherboard - contd
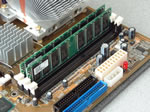 |
You should now install the memory Dimms (Dual
in line modules) These are fitted to the long memory slots next
to the processor. Open the two white levers at each side of the
slot, and press the DIMM into place, noting that it can only be
inserted one way. The plastic levers close automatically.
It is worth noting that some motherboard only allow memory to
be used in certain combinations, and in certain sizes, consult
your motherboard manual. |

|
The motherboard can now be fitted to the case.
You will see that there are a number of holes in the case, some
of which will corespond to holes in the motherboard.
Insert a "stand off" into each of these holes and tighten
the screw.
The motherboard is usually made up of several layers of insulator
with fine conductive strips in between. Any stress applies to
the board will result in it breaking, and they are impossible
to repair.
This particular brand of motherboard doesnt have any holes on
one side, and small rubber standoffs must be used on that side.
These provides plenty of support when the drive ribbon cables
are installed. |
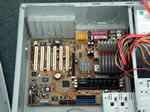 |
Place the motherboard in the case, ensuring that
the board sits snugly and all of the standoffs mate up with holes
in the board. Your motherboard will have been supplied with several
different types of screw, and it important that you use the correct
type and size of screw. Do not overtighten the screws. |
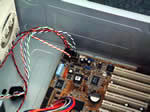 |
Consult the manual that came with your motherboard,
and decide which of the case leads you need to connect. As a general
guide, there should be
a) case speaker
b) case switch
c) reset switch
d) hard disk activity light
Each lead should be plugged into the correct socket, and you should
make sure that the polarity of the lead is observed (+ve goes
to +ve, -ve to -ve) |
Click here
to jump to page four
|