Worksheet 4
Laying out the design with Tables
|
Why use tables for design?
Have you noticed that you can't always click your cursor anywhere
you like on your web page? Try clicking somewhere in the middle
of your page now. What happens? Because of this, web
designers use tables to lay out their pages. Creating a table
lets you enter text and images into the table boxes or cells,
thereby giving you more control over where you can place things
on the page. |
Adding a simple table
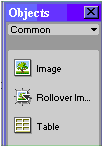
To do this we'll use a new floating palette called the Objects
Bar
From the Window menu select Objects
| |
Click on the third picture
down, the Table picture
Lets start by making a table that has 3 rows and 3
columns
Type 3 in the rows box and 3 in the
columns box
Type 70% in the Width box and click
OK
You should see a table with nine cells in it appear
on your page |
|
Changing the size of your table
Notice how when you move your cursor over a table border
it changes shape into a double headed arrow? This means you
can change your table's size and shape. Practice dragging
the table lines in and out to change the shape of the table.
|
Selecting your table
In order to see what properties your table has, e.g. how
wide it is, how many rows it has etc you need to select
it.
To do this, click in the table you want to select. Then, from
the Modify menu choose Table and then, Select
Table
Selecting the table makes the Properties Inspector display
the table's properties.
|
 |
If the properties inspector isn't
visible choose Properties from the Window menu |
Adding text to your table
To add words to your table, just click in a cell in the
table and start typing
Or you can highlight and drag words you have already
created into your table
It's also possible to add pictures, links, and animations to
tables - We'll see how in later worksheets.
 |
Have you noticed what happens to the size
of the table as you type words into it? That's right -
tables will get bigger to fit whatever you put in them. |
|
Merging and splitting cells
Once you've made a table you can change how it looks by
merging and splitting cells.
Note that it's often easiest to merge and split table cells
before you add text to them!
Take a look at the table below. This table started off with
three rows and three columns. By merging some of the cells together,
we can produce an interesting layout to add content to.
A table with some cells merged together
|
You could put your site's name in here |
|
Have a list of
links to other pages down
here
|
Maybe a picture or
two in here? |
Some text describing your page
in here? |
| Your email address could go down here |
To split a cell: Click in the cell you want
to split. From the Modify menu select Modify then
Table then Split Cell. Then choose how many rows
or columns you want to split your cell into
To merge cells: Select two or more cells which you want
to add together by clicking and dragging across them. From the
Modify menu select Table and then Merge Cells
 |
Try making some tables with merged and split
cells yourself. You'll probably find it useful to draw
them out on paper first so you get the layout you want. |
|
Cell Spacing
If everything in your table looks too bunched up, try increasing
the number in the cell spacing box. You can find
this property in the Properties Inspector - Remember to select
your table first! |
Colouring Tables and their borders
Tables backgrounds don't have to be the same colour as your
page background. You can even choose a different colour for
each table cell - if you really want to!
First Select your table, then...
To change the background of the whole table: click the Bg
box, (background box), and choose a new colour
To change the colour of individual cells: select a cell by clicking
in it, click the tiny arrow in Bg box and choose a colour.
To change the size and colour of the table border: click the
tiny arrow next to the Brdr box and choose a colour.
Type a number in the border box, e.g. 2 to change the
border size
|
 |
To get rid of your table border
completely - which is what a lot of designers do - select
your table and then in the properties inspector
and type a 0 in the border box. You'll still
see a dotted line around your table in your Dreamweaver
page, but when you look at your table in a browser, the
line will disappear.
|
Recap of Work Sheet 4
- We learnt why web designers use tables, how to insert a
table and how to change it's shape and size
- We learnt how to add content to tables and colour the table's
cells and border
|
